How To Set Up Your Electric Guitar: The GuitarGuys Way!
Ask any guitarist about their setup and you’ll rarely get the same response. Some players aim for the lowest possible action possible, accepting small amounts of acoustic fret buzz as a tradeoff for enabling light fretting techniques. Others want to dig in and play with a heavier attack, necessitating a higher action to retain clean-ringing notes.
Still, terms such as ‘low action’ or ‘high action’ don’t make things much easier. What does low even mean? How low is low? And is your definition of low the same as another guitarist’s? Here lies the problem and why it’s really a personal journey for every guitarist to find what feels best for them. That’s where a guitar setup comes in.
Every electric guitar that comes through GuitarGuys is given a full checkover, clean, and setup as part of our service to you. Whether you’re buying a trusty axe to withstand the rigours of the road or a vintage rarity to treasure, a quality setup can make the difference between a diamond or a dud.
We use the very same steps discussed in this electric guitar setup guide to get every guitar playing the best it can, so feel free to follow this advice when setting up your own instrument. That being said, we always recommend taking your guitar to a trusted guitar technician or luthier for any tasks you don’t feel comfortable handling!
Why is setting up an electric guitar important?
Every electric guitar is a unique thing, all the way from the first one off the factory line to the latest batch from a Fender factory in 2026. Even with modern machining and CNC methods, woods are inherently fickle and independent materials to work with.
Many guitars leave factories set up far higher than they need to be to avoid any chance of fret buzz, dead notes, or for any minor production deficiencies to cause problems. Furthermore, guitar necks will simply move and change over time, and any guitar that’s been forgotten about for even just a month or two can feel like a totally different instrument to the last time you picked it up.
Playing techniques further complicate the matter, as do your choice of strings, pick, and so forth. The number of variables that affect an instrument’s playability is staggering, and many guitarists won’t have ever touched their guitar’s setup – simply accepting it as-is and never realising it could be improved.
It’s for all these reasons that a setup is one of, if not the most, valuable investments guitarists can make in their instruments – whether that’s a time or financial investment.
The T.R.A.I.N. System of Guitar Setups
This popular five-step method provides a methodical framework to check and adjust the key areas of an electric guitar that will impact playability – individually and collectively. The acronym stands for:
- Tune: Tune the guitar and ensure it’s in a ‘playing state’ before making other measurements and adjustments
- Relief: Measure and adjust the guitar’s truss rod to increase or decrease the bow (known as relief) in the neck
- Action: Measure and adjust the guitar’s bridge saddles to raise or lower each string’s height (known as action) relative to the frets
- Intonation: Measure and adjust the guitar’s bridge saddles to sharpen or flatten each string’s pitch across the fretboard (known as intonation)
- Noodle: Play the guitar and assess the changes made in previous steps
- Repeat as needed!
It’s really six steps, as the last one is pretty critical to getting the best results, but TRAINR isn’t quite as catchy. We’ll break down each step in the process, how to do this yourself at home, and what to aim for as a ballpark suitable for the majority of players.
Tools Needed For An Electric Guitar Setup
Guitars thankfully don’t require any strange or hard-to-source tools as part of a setup. The vast majority of electric guitars will simply need a Phillips screwdriver (crosshead) or two in varying sizes, a set of Allen keys (hex keys) in various sizes, and an accurate form of measurement, such as a small ruler, will work just fine.
Some guitars may have their own set of tools provided upon original purchase, and we always recommend to use those tools where available for maximum compatibility.
For anyone who plans to do several setups or achieve a more precise result we’d also recommend buying a set of feeler gauges, a quality string action gauge, and a guitar neck rest to make the process a little smoother across multiple instruments. These are not required in any way, but can just make the workflow that bit more enjoyable and accurate. Consider buying a guitar cleaning kit if you want to give your guitar a bit of TLC while you’re working on it too!
Step-By-Step Guide To Set Up Your Electric Guitar Using the T.R.A.I.N. System
It’s time to get to work. A few preliminary steps that will make the whole thing smoother:
- Create a clear space on a flat and sturdy surface, such as a dining table or worktop
- Lay out your tools ahead of time so they’re readily available
- Ensure you having good lighting over the work space
- Get a comfortable seat with good back support where possible
With all the above out of the way, it’s time to set up your electric guitar!
Tune
This one’s pretty simple. Tune up the guitar however you typically would – a tuning pedal, clip-on tuner, etc. – while the guitar is in playing position (i.e. on your knee or standing with a guitar strap). Tuning ensures the guitar is under the correct amount of string tension when making your measurements and alterations in the next steps.
Note: It’s important across all steps to perform any measurements, checks, or tuning from a playing position to ensure the most accurate tuning in the way the guitar will be used; a guitar laying on a table will be under different tension and strain than one held in your hands.
Relief
Neck relief is the secret killer of guitar playability worldwide. The number of times we’ve seen guitars that look like a lost cause simply just need a long, long overdue relief adjustment is staggering. Many guitars have likely never had the relief adjusted, in fact. It’s possibly the most impactful change you can make, but for many the most intimidating – it all comes down to the dreaded truss rod.
A truss rod is a metal rod that runs the length of a guitar’s neck, adjustable at either the headstock or the heel of the neck via an allen key or Phillips screwdriver in the vast majority of cases. Some select guitars will require a different tool, but will almost always come with that tool as standard, such as an allen wrench on a Gibson Les Paul.
The truss rod’s job is to counteract the forces placed on the neck by the strings when tuned up – the strings want to pull the neck inward and the truss rod fights to keep it straight. The amount of bow you allow the neck to have when under string tension is the neck relief. Tightening reduces relief by straightening the neck, and loosening increases relief by allowing more bow in the neck.

Here’s how to adjust neck relief:
- Place a capo on or fret at the 1st fret
- Fret where the neck and body meet, often around the 15th fret
- Measure the gap between the 7th fret and the strings, aiming for between 0.15mm (0.06”) and 0.25mm (0.010”)
- If the distance is larger than 0.25mm (0.010”) you need to tighten the truss rod. If the distance is less than 0.15mm (0.06”) you need to loosen the truss rod.
- You can use a thin piece of card, tap the string to check for a tiny gap, or use feeler gauges to measure this
- If the distance is larger than 0.25mm (0.010”) you need to tighten the truss rod. If the distance is less than 0.15mm (0.06”) you need to loosen the truss rod.
- Turn clockwise to tighten or anticlockwise to loosen the truss rod in 1/8th turns at a time, retune and measure
- Repeat this process until the desired relief is achieved
During this first step, it’s entirely possible that notes will stop playing cleanly – particularly if you’re tightening the truss rod – as you’re bringing the strings closer to the fretboard the more you straighten the neck out. Don’t worry if this is the case, as we’ll be aiming to fix that in the next step.
Some necks can have less relief than the measurements provided, which can be preferred by some players, but the range we’ve given is ideal for the majority of styles. Generally, heavier players will benefit from more relief across the neck.
Important: While most electric guitars will respond well to truss rod adjustments, each has a limit. If you feel too much tension or resistance when attempting to make an adjustment stop and seek help from a qualified guitar technician or luthier.
Action
With the neck relief set it’s time to adjust the action. This is the most subjective part of a guitar setup, as the desired action will depend on your playing style and preference, as well as the guitar’s fretwork and tolerance to low setups. We’ve outlined the most common ranges for electric guitar setups in the below table:
| Action | Low E String Height | High E String Height | Setup Notes & Difficulty |
| Low | 1.25mm – 1.75mm | 1mm – 1.5mm | Needs precise fretwork & a flat neck |
| Standard | 1.75mm – 2.25mm | 1.5mm – 2mm | Many guitars can achieve this action |
| High | 2.25mm+ | 2mm+ | Any guitar should achieve this action |
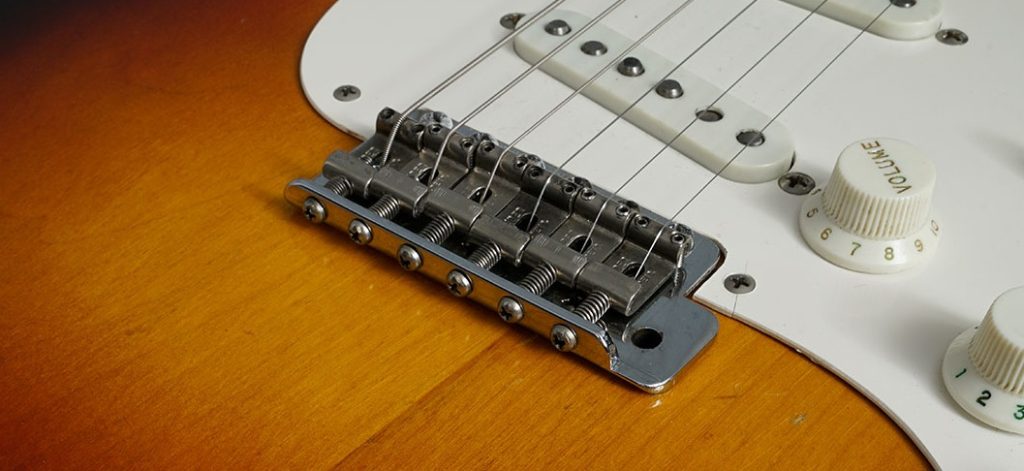
We use the bridge saddles to adjust the action by raising or lowering the saddle itself, raising the string height against the frets in turn. The lowest action your guitar can achieve is highly dependent on the fretwork and uniformity of the neck itself, and every guitar will have a minimum possible action it can achieve – if it seems like it can’t go lower without buzzing or the note fretting out you’ve likely hit the limit.
Here’s how you adjust an electric guitar’s action and string height:
- Measure the height of the string at the 12th fret in playing position
- See the table above for your starting measurement
- Find the Allen key that snuggly fits the bridge saddle screws and detune your string a few turns
- Turn the saddle screws clockwise to lower string height, and anticlockwise to raise string height
- Adjust screws by a quarter turn at a time while keeping the bridge saddle level
- Tune back to pitch and measure the string height
- Play every note to ensure they all play cleanly
- Repeat the process until you reach your target action and move on to the next string
Important: Strings should have a consistent sloping action that matches the radius of your fretboard and ensures consistent playability. This means that your overall setup will be determined by your ‘worst performing’ string – the one that needs the highest action to play cleanly – and you may need to return to previous strings to raise or lower them accordingly.
For example, if your low E string achieves 2mm action, you’ll want to aim for a cadenced action as you go – 1.9mm for the A string, 1.8mm for the D string, 1.7mm for the G string, 1.6mm for the B string, and finally 1.5mm for the high E string.
Intonation
Intonation is the final major step in getting your guitar playing to perfection, and this can be the dealbreaker for an otherwise perfect setup. The overall length of the string from nut to bridge determines the pitch of the string at each fret, and each string will have a slightly different intonation to ensure accurate pitch across frets.
How to set the intonation of an electric guitar:
- Tune the string to pitch
- Fret and play the 12th fret note
- This note is the same note as the open string but an octave higher
- Note the reading on the tuner and check if the note is sharp, flat, or in-tune at the 12th fret
- If the note is flat (below the target note), bring the saddle forward to shorten the string
- If the note is sharp (above the target note), bring the saddle backward to lengthen the string
- Loosening the string can make adjusting saddles easier
- Retune the string after moving the saddle, as it will have taken the string out-of-tune
- Check the open string and the 12th fret multiple times to ensure accuracy
- Follow this process for each string
If every string is in-tune when played both open and at the 12th fret your intonation for that string should be set. Make sure to listen in the next step to ensure the guitar remains in tune as you play up and down the neck.
Noodle
This is the best part. Pick up your guitar, give it another tune, and play away! Get a feel for the changes you’ve made and check each note across the fretboard play cleanly. Check bends across the upper registers to ensure they sustain well, and just generally get acquainted with the new feel of your electric guitar.
If something feels off – trust your gut. Measurements go a long way to getting a good setup but you can only trust yourself to know what feels best. If you feel like you need more space to dig into the strings, consider raising the action or adding relief. If you’re hearing some inconsistency in pitch at the upper register check the intonation and ensure it’s accurate.
If you feel as though the volume levels have dramatically changed, it’s likely that the setup has been drastic enough to change the string height against your pickups. Typical pickup height for an electric guitar will measure at 2.4mm for the low E string and 1.6mm for the high E string – simply measure from the pole piece of your pickup to the string above and adjust the pickup as needed using a Phillips screwdriver.
If it feels good you’re all set!
Pat yourself on the back, let the guitar sit for a day, and recheck the neck relief after 24 hours to ensure it hasn’t shifted. Necks that haven’t been adjusted for a long time or have received a large amount of adjustment may need more adjustment as they settle into the new tension, so don’t be alarmed if it’s not quite how you left it the day before!
Important: Remember that it’s your instrument at the end of the day, so do what makes it feel right for you and your style. It’s not a competition to get the lowest possible action, even if others might tell you otherwise.
Other Areas To Check
There are a couple of extra areas that we personally check during a guitar setup, though these do require more advanced techniques and tools to do correctly. We only recommend a qualified technician to perform these steps, as they are destructive in nature and cannot be undone!
Nut Action
The height of the slots in your electric guitar’s nut will affect the action at the first few frets. Guitars with high action across the first five frets will often need the nut slots filing down to allow the strings to sit lower to the fretboard. Special files are required that match the gauge of the string in that slot to ensure it doesn’t cause issues.
Fret Levels
Frets should ideally be completely flat from one to the next across the length of the fretboard. Frets will be flattened or ‘levelled’ during the manufacturing process, but it’s not always done to precision accuracy, and guitars with playwear will have fretwear that can cause fret height issues.
If a specific note is not playing cleanly while the notes before and after are fine it’s likely you have a high fret as the culprit. The offending fret needs to be filed down and brought in line with the rest of the fretboard. In cases where multiple frets are high, it’s recommended to do a full fret level and ensure flatness across the whole neck.
The Last Note
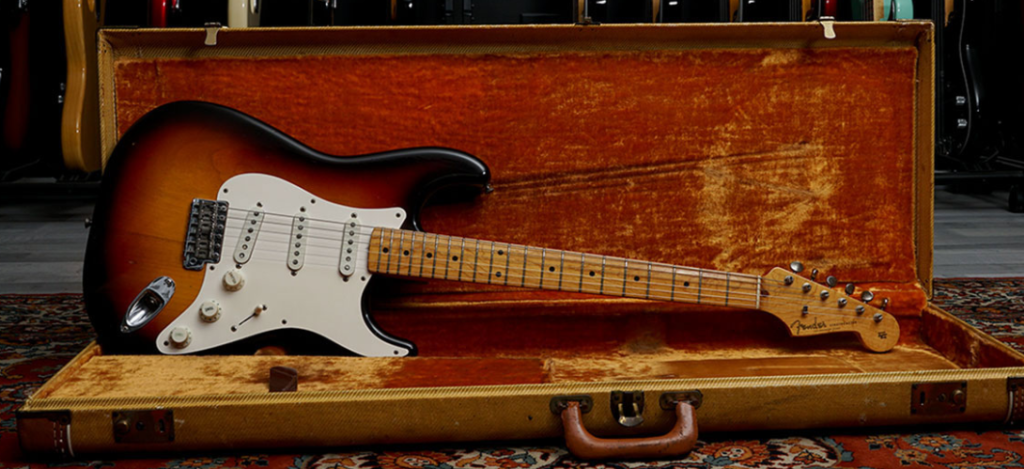
A quality guitar setup is a transformative thing. No matter how expensive the guitar is, a setup is a must. Even a custom-shop Fender strat will benefit from getting checked over and adjusted.
We truly think that going through the process of adjusting your guitar will help you to learn more about your instrument and strengthen your bond with it too. You’ll learn what it can and can’t do, and how it responds to varying conditions, and this can inform your own technique and approach.

Worldwide Shipping
available with all orders

Sell or Trade
Sell/trade your guitar or find your next guitar

Have a question?
An update on the latest new guitars at GuitarGuys,Want to know more?
Join our newsletter.
live video demo’s, promotional offers and giveaways.

